
Edit Color Labels In Adobe Classic
Edit Color Labels in Adobe Lightroom
Intro
In Lightroom classic you might be familiar with using color labels with individual photos, but did you know you can use color labels for folders in Lightroom as well?
Are you like me sometimes where you take a bunch of pictures, you go in and edit some. You leave some unfinished, then go off, take more pictures and do it again.
Now you have folders that have some potential good photos but after a while you don’t know where they might be anymore.
It would be easier if there was a visual cue to let you know where you left off even if you had to work on other things for a while and wanted to get back into things.
There is.
Just like when you set a color label for an individual image, you can add a color label to a folder and a collection.
You can also add names to them to keep your workflow consistent.
Steps to take
If you right click on a folder you can see an option to Add color label to folder.

The default is just to tell you the color of the label.
Let's customize it.
Go up to the Metadata menu
Click on Color Label Set
You will see some default options.

But if you go to Edit you can make your own.

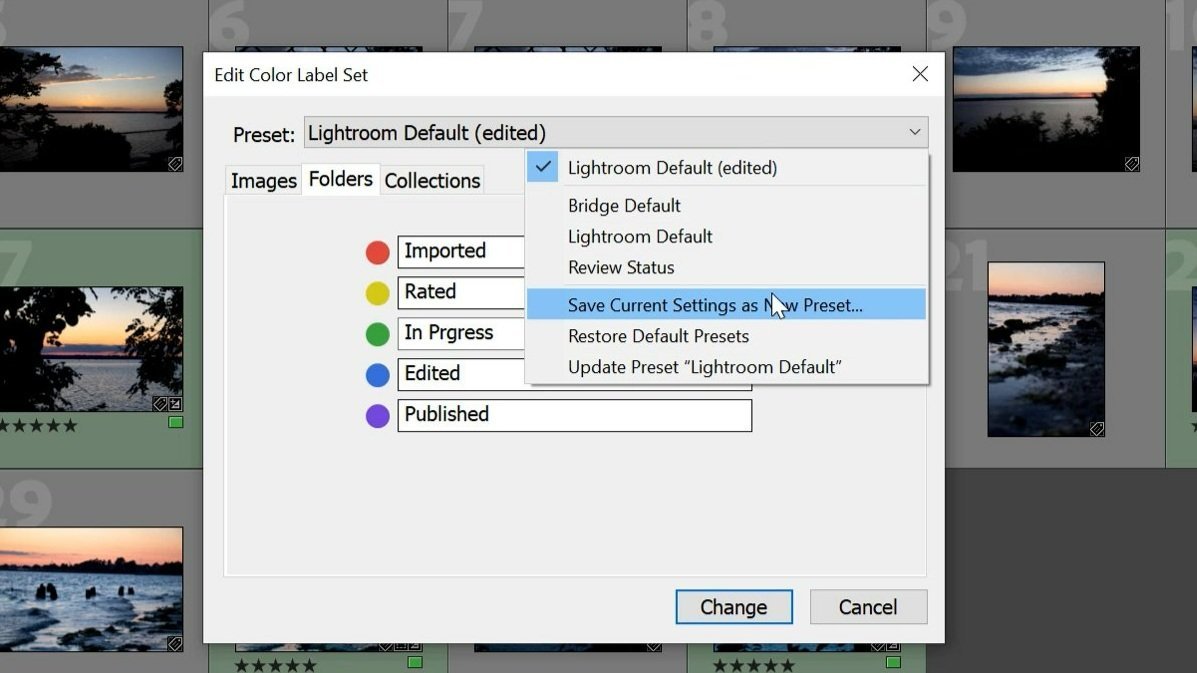
In this window you have the option to edit the color labels for Images, Folders and Collections.
We are going to focus on Folders right now.
The Color Label I Use
Red - Imported
I just brought them in, added metadata, tags, but that's it
Yellow - Rated
I have looked through them. I made my selections on which ones I want to work on.
Green - In Progress
I have made some edits, but still working on others.
Blue - Edited
Done with the processing, and I need to export them.
Purple - Published
I have completed the full process in this folder. The selected images have been exported and those are somewhere, either on social media, printed, sent off to other people.

After that you can save the changes as a custom preset and make them specific to the type of work you are doing.
Thank you for reading.
Affiliate Links
Camera and Audio
Camera: https://amzn.to/3zjnIiN
Lens: https://amzn.to/3uXWRWK
Microphone System: https://amzn.to/3RMquUI
Microphone: https://amzn.to/3PzO3yR
Tripod: https://amzn.to/3AXF5H7
Tripod Head: https://amzn.to/3zfQRuV
Field Monitor: https://amzn.to/3PjmLfX
Magic Arm: https://amzn.to/3aSJ5xJ
Monitor Carrying Case: https://amzn.to/3cpPEbN
Camera Bag: https://amzn.to/3Ohvpu6
Drone: https://amzn.to/3uXWRWK
Lighting
Ring Light: https://amzn.to/3uZ42OF
Bar Light: https://amzn.to/3zfsZYn
Light Stands: https://amzn.to/3yPC099
Computer and Editing
Monitor: https://amzn.to/3cpyMSu
Editing Console: https://amzn.to/3PGClSD
Bluetooth KeyboardL https://amzn.to/3cetvwM
Mouse: https://amzn.to/3PGAHjV
Audio Interface: https://amzn.to/3aSN8Kr
Speakers: https://amzn.to/3cru3Q7
Headphones: https://amzn.to/3aKl4ct
External Hard Drive: https://amzn.to/3IMpcVQ
Backup Storage: https://amzn.to/3PjZwCm